
How I Put Home Assistant Inside My RV (And Why I’d Never Build Another Van Without It)
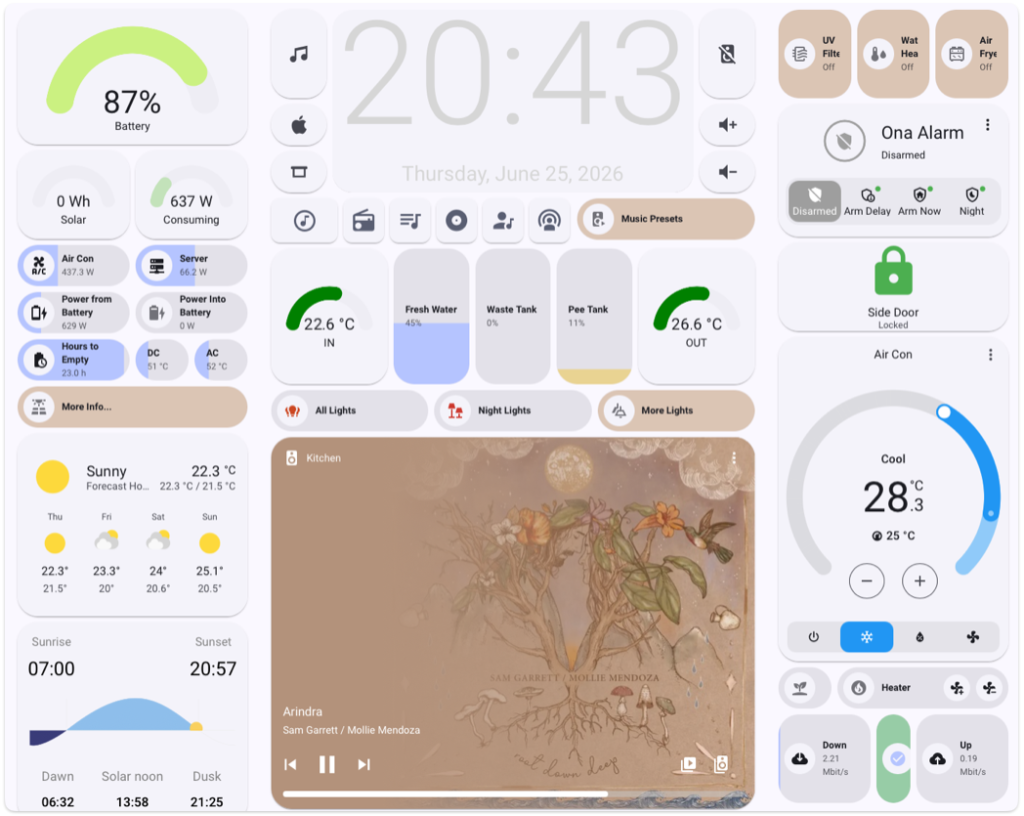
When most people think about a camper van electrical system, they think about batteries, solar panels and maybe a WiFi router.
I wanted something more.
After renovating three camper vans, I realised that the biggest frustration wasn’t usually a lack of power or internet. It was having lots of separate systems that didn’t communicate with each other or completely manual controls for things that just make more sense to be remote controlled – like electronic waste tank valves.
I also created a complicated, but very useful system in our second camper, I had a temperature sensor inside the van and a way to remotely view my battery state of charge. As we like to be in warm places, if we decided to spend the morning or afternoon at the beach, I would always keep an eye on the temperature inside the van, and as it started to get above 27 degrees celsius I would check the batteries had sufficient charge and remotely turn on the Air Conditioning unit. This way the van never used to boil inside and put at risk all the electronics, food & anything else getting too hot. The system however required me to log into one app to check the temperature, another to check the batteries and finally the last app to turn on or off the Air Conditioning.
For my current smart camper build, I wanted a single system that could bring everything together. A central brain that could monitor, control and automate the entire van, including this clunky Air Conditioning setup.
That’s where Home Assistant comes in.
What Is Home Assistant?
Home Assistant is an open-source smart home platform that allows thousands of devices and services to work together.
Think of it as the operating system for a smart camper van.
Instead of opening five different apps to control five different devices, Home Assistant gives me a single dashboard where I can see and control everything.
Lights, sensors, cameras, internet systems, automations and notifications all run through the same platform.
The result is a camper van that feels less like a collection of gadgets and more like a complete integrated system.
Why I Chose Home Assistant For My Camper
One of the biggest advantages of Home Assistant is flexibility.
Unlike many commercial smart home ecosystems, Home Assistant isn’t tied to a single manufacturer.
This means I can choose the best products for each job and bring them together in one place.
My current setup includes products from multiple brands, all working together through Home Assistant.
As the van evolves, I can continue adding new devices and integrations without needing to replace the entire system.
I initially wanted to stick with the Apple Home app, as this would just tie into everything all the devices I already use. However, not all smart products will talk to Apple Home, others require a server, adaptor, hub etc… and others will just simply not work so putting the effort in to get home assistant installed was the best decision I made.
The Brain Behind The System
Home Assistant runs on the same M4 Mac Mini that powers the rest of my camper van server infrastructure.
The Mac Mini hosts:
- Home Assistant
- Plex Media Server
- Immich Photo Management
- Music Assistant
- gPodder Sync
- Network storage and file sharing
Despite running all of these services simultaneously, the Mac Mini barely notices the workload. Occasionally I also use the Mac Mini to work on at the same time, so absolutely this device can do it all.
If you’d like to see the complete server setup, check out my guide:
[Read: Why I Run an M4 Mac Mini Server in My Camper Van →]
My iPad Pro Dashboard
One of my favourite parts of the system is the dashboard.
Mounted inside the camper is an iPad Pro that acts as the control centre for the entire vehicle. I first tried a relatively inexpensive Lenovo tablet, as many people rate android tablets over iPads for dashboards, however, after so many freezes, the battery just deciding to stop charging whenever it wanted and the inability to use the tablet for anything else as it was maxed out running the dashboard made me decide to try using my old 12.9″ iPad Pro, and wow – the higher resolution and larger screen gave me so much more room to display and control my home and it just works, all the time!
From a single screen I can:
- Monitor battery levels
- Check temperatures
- Control lighting
- View security cameras
- Monitor internet connectivity
- Access media systems
- Manage automations
Rather than hunting through multiple apps, everything is available instantly.
This has become one of those features that sounds unnecessary until you’ve lived with it for a while. Now I couldn’t imagine being without it.
Temperature Monitoring Throughout The Van
One of the simplest yet most useful additions has been a collection of Aqara temperature sensors.
These small wireless sensors allow me to monitor temperatures throughout the vehicle, including:
- Living area
- Bedroom area
- Battery compartment
- Outdoor temperature
Because everything feeds into Home Assistant, I can also create alerts and automations based on temperature changes.
So going back to my air conditioning requirements from the start of this article, Home Assistant can now monitor temperatures, battery levels and solar production all in one place.
I can create automations that manage the climate inside the van automatically, and if conditions fall outside my preferred limits, Home Assistant can send me a notification so I can decide the best course of action.
Living in a metal box means temperatures can change quickly, so having this level of visibility and automation has been a complete game changer.
For full-time travel, this extra visibility provides a lot of peace of mind.
Smart Climate Control With Sensibo
One of the devices that makes this possible is the Sensibo air conditioning controller.
Rather than relying on a traditional remote control, Sensibo allows the air conditioning system to integrate directly into Home Assistant.
This gives me the ability to:
- Control the system remotely
- Create temperature-based automations
- Monitor climate conditions
- Manage everything from a single dashboard
Combined with the temperature sensors around the van, this allows Home Assistant to maintain a comfortable living environment with very little intervention from me.
The air conditioning system has become one of the most important upgrades we’ve ever made to a camper van, so I’ve written a dedicated article covering the complete setup, power consumption and how we run it entirely off-grid.
[Read: How We Run Air Conditioning All Day Off-Grid In Our Camper Van →]
Security And Remote Monitoring
Security was another area where Home Assistant made a huge difference.
I currently use an Aqara camera integrated into the system, allowing me to monitor the camper remotely whenever needed.
The camera provides:
- Live viewing
- Motion detection
- Notifications
- Remote access
Because it is integrated into Home Assistant, camera events can also trigger automations and alerts throughout the rest of the system.
This level of integration simply isn’t possible when every device operates independently.
And there is nothing more comforting than being able to check a live feed of inside your camper after the alarm has been triggered maybe by a shadow or something strange setting off a motion sensor.
My Favourite Home Assistant Automation
One of my favourite automations is also one of the simplest.
The van uses a UV water sterilisation system to help keep the fresh drinking water supply clean.
Rather than leaving the UV filter running continuously that will actually heat the water and burn the bulb out much faster, I wanted a more efficient solution.
A motion sensor is installed behind the drinking water tap.
Whenever motion is detected (me reaching to turn on the tap), Home Assistant activates a smart plug that powers the UV steriliser.
The system then automatically switches itself off after a set period of time depending on the time of day/night. I also have it turn one of the counter lights violet so it is clear that it has come and is working correctly.
The result is:
- Lower power consumption
- Reduced wear on the UV system
- Completely automatic operation
- No manual switches required
- Room temperature water coming out the tap
It’s a small automation, but it’s a perfect example of why I love Home Assistant.
Another example, in our second van we also installed a remote controlled valve to open and close our waste tank to empty it. Like the air conditioning this had it own app just for this feature.
With home assistant it just takes it to another level. I can have a simple indicator on the dashboard to confirm if the valve is open or closed, so we have piece of mind that we haven’t forgotten to close it and have grey water emptying under the van. But on the same dashboard that feeds me all the other information I can simply press to open and close the valve. So on my driving dashboard as soon as we pull up to an emptying spot I do not even need to get out, I just push a button and the not so pleasant job is done with zero unpleasantness – also helpful in the rain as long as I don’t have to fill up also!
The goal isn’t automation for the sake of automation.
The goal is making everyday life simpler.
Why Home Assistant Makes The Van Feel Alive
What I love most about Home Assistant isn’t any single device or automation.
It’s the way everything works together.
The temperature sensors communicate with automations.
The camera communicates with notifications.
The air conditioning responds to environmental data.
The dashboard displays everything in one place.
Every system contributes to a larger ecosystem.
Rather than having a collection of smart gadgets, the entire van behaves like a connected and intelligent home.
Is Home Assistant Worth It In A Camper Van?
If you’re building a simple weekend camper, Home Assistant may be overkill.
But if you’re living in your van full-time, travelling extensively, working remotely or simply enjoy technology, I think it’s one of the most powerful upgrades you can make.
It provides visibility, control and automation that simply isn’t possible with traditional systems.
After living with it, I genuinely wouldn’t build another camper van without it.
What’s Next?
This article only scratches the surface of what’s possible.
Over the coming months I’ll be sharing more detailed guides covering:
- My complete Home Assistant dashboard
- The best sensors for camper vans
- Home Assistant automations I use every day
- Remote monitoring from anywhere in Europe
- Smart climate control setups
- Integrating Home Assistant with camper van electrical systems
Stay tuned as the Smart Van project continues to evolve.
Need Help Building A Smart Camper?
If you’re planning your own smart camper van and would like help choosing hardware, designing automations or integrating Home Assistant into your build, take a look at my consultation services or get in touch.
I’d be happy to help.

Hi, I’m Luke.
I’ve personally renovated three camper vans from the ground up, including complete electrical systems, plumbing, solar, networking and smart automation.
This website documents my latest project: building one of Europe’s most advanced smart camper vans.
About us | Consultation Services | Work with us
Just stumbled onto your website via a facebook post. I am doing a similar thing on our yacth, but also now started work on making our caravan smart. So i will be reading on about your solar install with interest.
Hey, thanks for taking the time to have a look. I am doing my best to get everything finished and documented, taking more time than I thought… But appreciate your interested, if you have any questions please feel free to ask. I have spent the last year building this dream ‘smart van’ and cannot believe how much I have learnt and researched for it, so would be great to be able to share this process and help others.